Table of Contents
Replacing image files
Images in OMORI contain most visual elements you can see through the game, those include but are not limited to:
- Battle backgrounds
- Characters
- Enemies
- Faces
- UI
Changing images can be done with any image editor and requires a decrypted copy of OMORI.
Finding the files to replace
The first step to modifying the game's images are locating the images you want to change.
Images can be found under img in the folder of your decrypted copy.
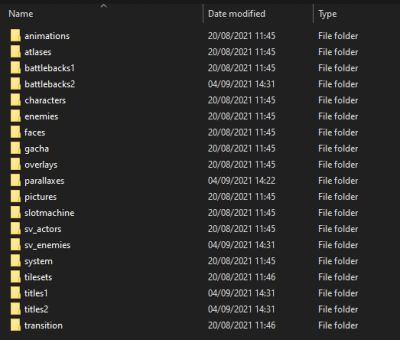
Under img you should find the following folders
Each folder contains a series of image files, usually in a png format, that each serve the purpose indicated by the folder's name.
| Folder name | Folder contents |
|---|---|
animations | Frames that compose the animations appearing in combat |
atlases | Miscellaneous images, themselves made out of images from other folders, mainly for ease of access and loading, editing those should not be required for anything |
battlebacks1 | Backgrounds that appear in battle |
characters | Miscellaneous sprites that appear in the overworld |
enemies | Images of the enemies that appear in FOE FACTS |
faces | Faces of the various main characters, both in combat and out of combat |
overlays | Images that appear overlaid on top of the game during certain story segments |
parallaxes | Backgrounds that appear on certain maps, most notably in BLACKSPACE |
pictures | Miscellaneous images used for all sorts of purposes |
slotmachine | Images that appear in the slot machine minigame in the LAST RESORT |
sv_actors | Images of the enemies that appear in combat, including emotion variations and animations |
system | Images that form the game's user interface |
tilesets | Tilesets that are used in maps throughout the game |
Editing sets of images
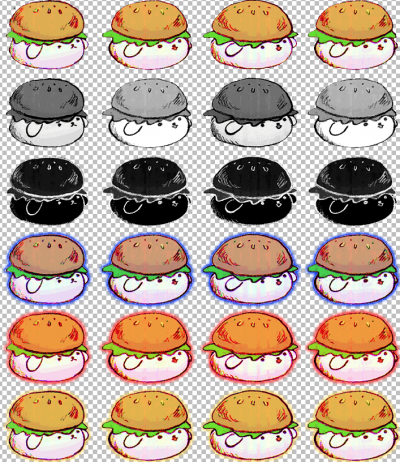
Some images you might find appear to contain multiple sprites, those can either be used as animation frames, indications of a state, or both.
img/sv_actors/!battle_bun_bunny.png is an example of such an image
Those images can be divided in multiple ways, depending on their purpose in the game, as such it is recommended to keep in mind the original layout while editing the image. The division does not care for the image's size, as it is done dynamically.
For instance, all battle sprites are divided in a 4×6 pattern, the image that is displayed in the battle changes alongside the horizontal axis to form an animation, and the status of the enemy dictates the vertical position of the image (Neutral, taking damage, defeated, sad, angry and happy).
Note: Certain enemies, notably enemies that can feel more emotions than just SAD, ANGRY and HAPPY will have more vertical sprites in their image
Putting the images in a mod
After editing your images, you must put them in your mod folder under the same path relative to your decrypted /www/, for instance, if you have edited the image in www_playtest_01234567/img/sv_actors/!battle_bun_bunny.png, you must put that image in www/mods/<yourmodID>/img/sv_actors/!battle_bun_bunny.png.
Afterwards, you must edit the file www/mods/<yourmodID>/mod.json to include the path to your modified image's folder in its assets, so in our example, your mod.json should look similar to this:
{
    "id": "yourmodID",
    "name": "Your mod's name",
    "description": "A longer description for your mod",
    "version": "1.0",
    "files": {
      "plugins": [],
      "text": [],
      "data": [],
      "maps": [],
      "assets": ["img/sv_actors/"],
      "exec": []
    }
  }
And done! Your modified file should now appear in game in the place that you replaced.
Image Deltas
Image deltas are a special type of file introduced in OneLoader V1.0.0. They provide a new way to edit images in your mods, by storing the difference between the original image and the new one. While this technique takes a bit of time to load when the game starts, image deltas can be stacked on top of each other allowing for greater compatibility between different asset changing mods.
It is often recommended to use image deltas instead of replacing images if you are only changing a small part of an image, for instance if you are adding an accessory or a detail to a face.
Generating an image delta
To generate an image delta, simply follow the following steps
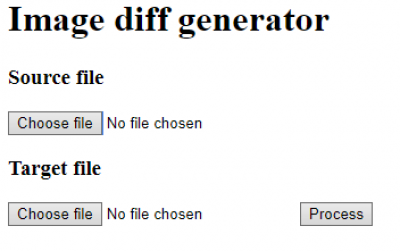
- Visit the OLID generator
- Upload the original unmodified file as the Source file
- Upload the modified file as the Target file
- Press process
You will be given a .olid file. To verify if your file works, use the delta applier with the original unmodified file as the Source file
Applying an image delta
Putting an image delta in an OMORI mod is similar to replacing raw images, however it does take a few more steps
- Put your olid file anywhere in your mod folder and take note of its path
- Add the entry
“do_olid”to the“_flags”array in yourmod.jsonfile. If you do not have that array, create it. - Add an entry with the syntax
{“patch”:“img/<folder>/<original image file>.png”, “with”:“<path/to/olid/file>.olid”}to the“image_deltas”array in yourmod.json file. If you do not have that array, create it.
For instance, if you have modified the file img/sv_actors/!battle_bun_bunny.png and your .olid file is stored in /<yourmodID>/olid/!battle_bun_bunny.olid, your mod.json file should look similar to this:
{
    "id": "yourmodID",
    "name": "Your mod's name",
    "description": "A longer description for your mod",
    "version": "1.0",
    "_flags":[
      "do_olid"
      ]
    "files": {
      "plugins": [],
      "text": [],
      "data": [],
      "maps": [],
      "assets": [],
      "exec": [],
      "image_deltas": [
        {"patch":"img/sv_actors/!battle_bun_bunny.png", "with":"/<yourmodID>/olid/!battle_bun_bunny.olid"}
       ]
    }
  }
And done! Your modified file should now appear in game in the place that you replaced.


